Photoshop Tips and Tricks for Beginners


These Photoshop beginner tips and shortcuts address some of the most common things you'll do in Photoshop, and learning them will save you lots of time down the road.

Create Project-Specific Custom Workspaces
Photoshop lets you create custom workspaces that display just the palettes you need for a specific project. For instance, if you're planning on working with text, you'll want to have the Paragraph and the Character palette open. But later you might be editing some Photos and want to close your text palettes to make room for photo editing palettes like color swatches and brushes. With custom workspaces you can switch quickly.
Photoshop Tips and Tricks for Beginners
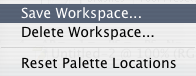
Once you've arranged the palettes just the way you want them, choose Window> Workspace> Save Workspace. Name your workspace and then click Save. Here's another tip - plan ahead so your custom workspace names make sense. This will be another time-saver later on when you need to locate one from the Workspace submenu.

Display The Same Image In Two Windows
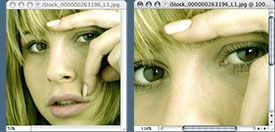
When doing detail work on an image you may need to zoom in to take a closer look at the pixels. But to make sure that any changes you're making in this magnified state will look realistic at a normal view you'll have to zoom out for a quick look. Here's a great tip - instead of zooming in and out you can have the same image open in two windows at the same time.
Photoshop Tips and Tricks for BeginnersWith an open image selected choose Window> Arrange> New Window (the original file name will be listed). The same image will now appear in a new second window. 
Keep one window set at 100% to see your effects, and work in the second window - either zoomed in or zoomed out. Sweet.

Instant Grabber Hand
Photoshop Tips and Tricks for Beginners
Ever been frustrated by having to switch tools to move your image around the canvas? Here's the solution — Press the Spacebar to temporarily activate the Hand Tool. Click to move an image freely inside a canvas area that is smaller than the image. Release the Spacebar and the hand tool will revert back to the current tool you have selected. 

Getting Rid Of The Marching Ants
Photoshop Tips and Tricks for BeginnersSelecting an object will activate a line of dashes that blink to show you the selection's edge (marching ants), but they can be a visual nuisance at times. To quickly hide the selection marquee, Press Command+H (PC: Control+H). To view them again just repeat the shortcut.

Quick Revert - The Undo Command
To undo your last image modification Press Control+Z (MAC: Command+Z), and repeat the shortcut to undo the undo. Toggling back and forth like this is a good technique to review the before and after effects of a one-step change to an image, like dodge or burn.

For situations where you need to perform a multiple undo, go Edit> Step Backward or use Control-Alt-Z (MAC: Command-Option-Z. To go the other way (multiple redo) go Edit> Step Forward or use Control-Shift-Z (MAC: Command-Shift-Z). The number of steps available is the same as the number of History States, which can be changed in General Preferences.

Control Your Color Squares
Press D to reset your color squares to their default of black as the foreground color and white as the background color.
Press X to switch your foreground color and your background color.
Photoshop Tips and Tricks for BeginnersTo change the color of one of the color squares Click on a Color Square. This brings up the color picker, where you can select a new color.

Selecting Colors From An Image Quickly
Press I to activate the Eyedropper Tool and then click on any color in your image to turn that color into the foreground color. Press the ALT Key and click on any color in your image to turn that color into the background color.

Change Brush Tip Sizes Quickly
With a brush selected, simply Press the Right Bracket Key "]" to increase the size of your brush tip, or Press the Left Bracket Key "[" to decrease the size of your brush tip.

The Move Tool & The Arrow Keys
Photoshop Tips and Tricks for BeginnersGet in the habit of calling up the Move Tool with the keyboard shortcut, which is the letter V. Also, once the Move Tool is active you can use your Keyboard Arrow Keys to nudge a layer or selection in 1 pixel increments. To speed things up, Press Shift along with an arrow key to nudge in 10 pixel increments.

Hide Your Palettes
Press Tab once to hide all your palettes. Press Tab again to bring them back. Press Shift+Tab to hide all your palettes except the toolbar.

Zooming In & Zooming Out
Photoshop Tips and Tricks for BeginnersTo zoom in Press Command and the plus sign "+" (PC: Control and the plus sign). To zoom out Press Command and the minus sign "-" (PC: Control and the minus sign).

Navigating In Magnified Images
If you've zoomed in on a large image and have lost your bearings you can jump quickly to specific views using these shortcuts:
Press the Home Key to set the view to the top left hand corner of your image.
Press the End Key to set the view to the bottom right hand corner of your image.
Press the Page Down Key to move the view one full screen down.
Press Command+Page Down (PC: Control+Page Down) to move the view one full screen to the right.
Press Command+Page Up (PC: Control+Page Up) to move the view one full screen to the left.

Selecting Just The Pixels On A Layer
Photoshop Tips and Tricks for Beginners
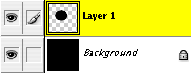
An easy way to select an object that is on a transparent layer is to Press the Command Key (PC: Control key) and click on the layer with the object in the Layers Palette. This makes sure that only the opaque pixels (the pixels that are visible) will be selected with the marching ants, instead of the entire layer.

Tile Images For Better Visibility
When you open many files at once Photoshop has them cascade, and the overlapping files can make it difficult to select individual ones. To get around this choose Window> Arrange> Tile and all of your open files will rearrange themselves to be visible all at once. When you're ready to close them all don't spend time closing them individually, instead use the Close All shortcut Command+Alt+W (PC: Control+Option+W).

Getting Rid Of The Welcome Screen - And Bringing It Back
Photoshop Tips and Tricks for Beginners
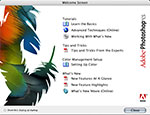
When first launching Photoshop CS you'll see a Welcome Screen that has links to some Tutorials, some Tips and Tricks, and a set of Color Management Help Files. After a while you might want to get rid of this screen. There's a check box at the bottom you can select to hide the screen at startup. 
If you change your mind later and decide you'd like to investigate the tutorials and other goodies, you can temporarily bring the screen back by going under the Help menu and choosing Welcome Screen.

Cycle Through All Of Your Open Documents 
Sometimes you'll want to find one of your open documents that is hidden, but navigating using the Window menu won't help because you can't recall the name of the file. Instead press Control-Tab repeatedly (MAC and PC) to cycle through all of your open documents.


What Is 64-bit Computing?

32-bit refers to the number of bits (the smallest unit of information on a machine) that can be processed or transmitted in parallel, or the number of bits used for single element in a data format. The term when used in conjunction with a microprocessor indicates the width of the registers; a special high-speed storage area within the CPU. A 32-bit microprocessor can process data and memory addresses that are represented by 32 bits.

64-bit therefore refers to a processor with registers that store 64-bit numbers. A generalization would be to suggest that 64-bit architecture would double the amount of data a CPU can process per clock cycle. Users would note a performance increase because a 64-bit CPU can handle more memory and larger files. One of the most attractive features of 64-bit processors is the amount of memory the system can support. 64-bit architecture will allow systems to address up to 1 terabyte (1000GB) of memory. In today's 32-bit desktop systems, you can have up to 4GB of RAM (provided your motherboard that can handle that much RAM) which is split between the applications and the operating system (OS).

The majority of  desktop computers today don't even have 4GB of memory installed, and most small business and home desktop computer software do not require that much memory either. As more complex software and 3D games become available however, we could actually see this become a limitation, but for the average home user that is very far down the road indeed.


Unfortunately, most benefits of a 64-bit CPU will go unnoticed without the key components of a 64-bit operating system and 64-bit software and drivers which are able to take advantage of 64-bit processor features. Additionally for the average home computer user, 32-bits is more than adequate computing power.

When making the transition from 32-bit to 64-bit desktop PCs, users won't actually see Web browsers and word processing programs run faster. Benefits of 64-bit processors would be seen with more demanding applications such as video encoding, scientific research, searching massive databases; tasks where being able to load massive amounts of data into the system's memory is required.

While talk of 64-bit architecture may make one think this is a new technology, 64-bit computing has been used over the past ten years in supercomputing and database management systems. Many companies and organizations with the need to access huge amounts of data have already made the transition to using 64-bit servers, since a 64-bit server can support a greater number of larger files and could effectively load large enterprise databases to into memory allowing for faster searches and data retrieval. Additionally, using a 64-bit server means organizations can support more simultaneous users on each server potentially removing the need for extra hardware as one 64-bit server could replace the use of several 32-bit servers on a network.

It is in scientific and data management industries where the limitations of the 4GB memory of a 32-bit system have been reached and the need for 64-bit processing becomes apparent. Some of the major software developers in the database management systems business, such as Oracle and SQL Server, to name just two, offer 64-bit versions of their database management systems.

While 64-bit servers were once used only by those organizations with massive amounts of data and big budgets, we do see in the near future 64-bit enabled systems hitting the mainstream market. It is only a matter of time until 64-bit software and retail OS packages become available thereby making 64-bit computing an attractive solution for business and home computing needs.


The Difference Between Hubs, Switches and Routers


Some technicians have a tendency to use the terms routers, hubs and switches interchangeably. One minute they're talking about a switch. Two minutes later they're discussing router settings. Throughout all of this, though, they're still looking at only the one box.  Ever wonder what the difference is among these boxes?  The functions of the three devices are all quite different from one another, even if at times they are all integrated into a single device. Which one do you use when? Let's take a look...
Hub, Switch, and Router Defined

Hub 
A common connection point for devices in a network. Hubs are commonly used to connect segments of a LAN. A hub contains multiple ports. When a packet arrives at one port, it is copied to the other ports so that all segments of the LAN can see all packets.


Switch 
In networks, a device that filters and forwards packets between LAN segments. Switches operate at the data link layer (layer 2) and sometimes the network layer (layer 3) of the OSI Reference Model and therefore support any packet protocol. LANs that use switches to join segments are called switched LANs or, in the case of Ethernet networks, switched Ethernet LANs.


Router 
A device that forwards data packets along networks. A router is connected to at least two networks, commonly two LANs or WANs or a LAN and its ISP.s network. Routers are located at gateways, the places where two or more networks connect. Routers use headers and forwarding tables to determine the best path for forwarding the packets, and they use protocols such as ICMP to communicate with each other and configure the best route between any two hosts. 


The Differences Between Hubs, Switches, and Routers on the Network

Today most routers have become something of a Swiss Army knife, combining the features and functionality of a router and switch/hub into a single unit. So conversations regarding these devices can be a bit misleading — especially to someone new to computer networking.

The functions of a router, hub and a switch are all quite different from one another, even if at times they are all integrated into a single device. Let's start with the hub and the switch since these two devices have similar roles on the network. Each serves as a central connection for all of your network equipment and handles a data type known as frames. Frames carry your data. When a frame is received, it is amplified and then transmitted on to the port of the destination PC. The big difference between these two devices is in the method in which frames are being delivered.

In a hub, a frame is passed along or "broadcast" to every one of its ports. It doesn't matter that the frame is only destined for one port. The hub has no way of distinguishing which port a frame should be sent to. Passing it along to every port ensures that it will reach its intended destination. This places a lot of traffic on the network and can lead to poor network response times.

Additionally, a 10/100Mbps hub must share its bandwidth with each and every one of its ports. So when only one PC is broadcasting, it will have access to the maximum available bandwidth. If, however, multiple PCs are broadcasting, then that bandwidth will need to be divided among all of those systems, which will degrade performance.

A switch, however, keeps a record of the MAC addresses of all the devices connected to it. With this information, a switch can identify which system is sitting on which port. So when a frame is received, it knows exactly which port to send it to, without significantly increasing network response times. And, unlike a hub, a 10/100Mbps switch will allocate a full 10/100Mbps to each of its ports. So regardless of the number of PCs transmitting, users will always have access to the maximum amount of bandwidth. It's for these reasons why a switch is considered to be a much better choice then a hub.

Routers are completely different devices. Where a hub or switch is concerned with transmitting frames, a router's job, as its name implies, is to route packets to other networks until that packet ultimately reaches its destination. One of the key features of a packet is that it not only contains data, but the destination address of where it's going.


So, in short, a hub glues together an Ethernet network segment, a switch can connect multiple Ethernet segments more efficiently and a router can do those functions plus route TCP/IP packets between multiple LANs and/or WANs; and much more of course. 


How to Convert PPS to PPT

Files with .pps and .ppt extensions are both created with Microsoft PowerPoint software. A .pps file opens directly as a PowerPoint slide show and automatically closes after the presentation is complete. These files are for presentations only and do not allow any editing. Conversely, .ppt files open in PowerPoint and allow the user to edit and make changes to the presentation slides. Converting a .pps file to a .ppt file is quite simple, does not require any special software and takes just a few minutes to complete with Microsoft PowerPoint


Instructions


  • Make sure the .pps file is saved on your computer in a location that you know how to access easily.
  • Open Microsoft PowerPoint. PowerPoint is usually found by accessing the "Start" menu and selecting "All Programs," and then the "Microsoft Office" folder.
  • In PowerPoint, go to the "File" menu and select "Open" from the drop-down list. A prompt will appear, asking you which file to open. Browse to the location of the saved .pps file and click the "Open" button.
  • From the "File" menu, select "Save As." In the "Save as type" box select "Presentation" from the drop-down list. Choose where you would like to save the .pps file and click the "Save" button. The original .pps file has now been saved to your computer as a .ppt file.


Tips & Warnings


  • Those who do not have Microsoft PowerPoint installed can still view .pps slide shows by installing the free Office PowerPoint Viewer from Microsoft.